Setup DIAS VMs
Access and configuration for DIAS virtual machine instances.
The most common Virtual Machines (VMs) structure of DIAS IaaS is as shown in the below figure. VMs are emulations of fully functional computational instances. They are based on computer architectures and provide functionality of a real physical computer. Users obtain VMs with full root access and can implement specialized hardware, software, or a combination based on their needs.
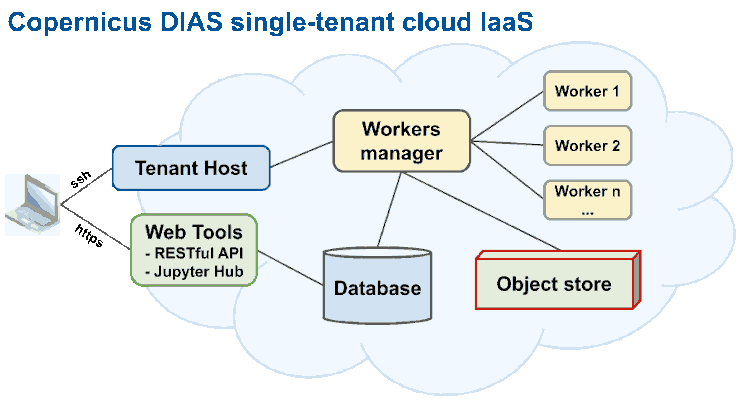
Simplified structure of DIAS IaaS
In a DIAS infrastructure users can define different parameters and characteristics of the VMs, including machine type (physical or virtual), RAM, CPU (vCores), Storage quantity and type, Operating System, middleware components and Virtual Networks connected to the machine. The parameters of the VMs depends on the processing needs of the specific project and the designed structure. An example of configured parameters of each VM can be found in the following table.
VMs |
vCores |
RAM |
Storage |
Notes |
|---|---|---|---|---|
Database |
4 |
16 GB |
500 GB |
Postgres database with PostGIS extension. |
Worker(s) |
8 |
16 GB |
60 GB |
The number of workers depends on the processing needs. |
Workers manager |
4 |
8 GB |
60 GB |
Also a worker VM can be configured to be a manager VM. |
RESTful API |
4 |
8 GB |
40 GB |
Can be combined with Jupyter server. |
Jupyter |
2 |
4 GB |
40 GB |
For a single user jupyter environment. |
Jupyter Hub |
8 |
32 GB |
100 GB |
For up to 10 active jupyter Hub users. |
Tenant host |
1 |
4 GB |
8 GB |
Can be combined with workers manager. |
Recommended OS for the VMs is Ubuntu 18.04 LTS.
Some VMs can be combined e.g. the RESTful API VM with Jupyter VM or Worker Manager VM with one of the workers VM, but it is recommended to keep the database VM separated and secured with regular backups.
Connecting to the ‘tenant host’ vm via SSH
From Linux (recommended):
To be able to remotely connect to an SSH server an SSH client program is needed. It can be installed on Ubuntu with the following command:
sudo apt install openssh-client
To connect to the remote computer, the hostname/domain name or IP address of the remote computer (provided by the servise provider) is needed.
To connect with SSH using Ubuntu, in the Home directory make a hidden folder if it doesn’t exist “.ssh”, with the command:
mkdir ~/.ssh
In .ssh make a text file “config” and a folder “keys”
touch ~/.ssh/config
mkdir ~/.ssh/keys
Move the key file to the keys folder
mv ~/YOURKEYLOCATION/NAMEOFTHEKEY.key .ssh/keys/NAMEOFTHEKEY.key
and change the permission of the file to 600
chmod 0600 ~/.ssh/keys/NAMEOFTHEKEY.pem
Open the “config” file with a text editor, e.g.
nano ~/.ssh/config
and add the following lines. Configure with the server information (HostName and User) and chage the NAMEOFTHEKEY with the filename of the key.
Host bastion_vm
  HostName 111.111.111.111 # or MYHOST.com
  User USERNAME
  IdentityFile ~/.ssh/keys/NAMEOFTHEKEY.key
  ServerAliveInterval 10    #  number in seconds to wait if the connection is lost
  VisualHostKey yes   # For visual security check
#  ProxyCommand nc -X connect -x 000.000.000.000:0000 %h %p # only if needed (replace with your proxy)
If everything is configured correctly it will be able to connect to the virtual machine remotely and manage and control the machine using the terminal. To connect to the VM run in the terminal:
ssh my_vm01
From Windows:
There are many different tools for window e.g.: PuTTY(https://www.putty.org), Bitvise(https://www.bitvise.com), Solar-Putty, KiTTY, MobaXterm, mRemoteNG, Xshell 6 Client, PuttyTray and SuperPutty. Documentation can be found in there website.